
Needlework Tuesday is a regular weekly post where I share the progress of my various needlework projects over the past week. I enjoy the encouragement that I receive from my readers and in return visit their blogs and cheer them on with theirs. You are welcome to grab the cute little mouse and create your own Needlework Tuesday post. Leave a comment with a link and I'll be sure to visit with you.

Good progress on my Aiming for Accuracy Quilt Along. This week the block uses Split Quarter-Square Triangles. If I pieced them as directed in the lesson, my pinwheels would be spinning I both directions. I wanted them all spinning the same way, so I used a different technique. first step was to layer the dark and light fabrics. I put the light on top. Then drew a line corner to corner in both directions. Next, draw on the stitching lines. They are shown in the dashed lines in the second square on the left. After stitching, press, then cut corner to corner twice. This gives four identical quarter square triangles as shown in the next photo. If you place the dark fabric on top before stitching, then you get the opposite orientation of colours after cutting apart


All of my split quarter-square triangles look like. In the paper sketch, in the upper right I show the two variations as per the original directions.

Note that all my pinwheels spin in the same direction.
In the tutorial instructions, you will notice that the pinwheels spin in both directions.
I prefer my version.


 |
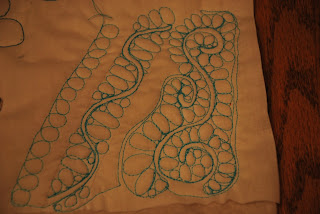
| This is how it looks stitched in the one inch sections. |
 |
| The narrow band at the bottom is filled with a single row of pebbles. The triangle above it is essentially as shown by Leah. It's not as smooth as I had hoped, but with each section I work on, it is looking better. This area was really puffy before I started to stitch , I wasn't sure how it would go as it rippled when I did the first part of the pattern. Fortunately as I stitched the ovals, it took in all the extra fabric without any creasing.
|
We have been having some very hot weather lately, and it's expected to continue for the next while. Makes for great indoor time and stitching. I'm looking forward to continuing with the blue areas. Do you have a favourite activity when it's too hot to spend time outdoors?
3 comments:
Your pinwheels are fantastic, Heather. I agree that having them all spin the same way looks better.
I love the pea gravel quilting you've chosen for the stained glass quilt. It looks like a lot of work.
I need to do better about piecing as well...wish I had time to join you on that.
Love your FMQ
good tips on the split quarter square triangles, I like the pinwheel block so that is good!
Post a Comment